Over the weekend I got a chance to try out the new Crimson Slaughter supplement and the new Helbrute data slate, and I'd like to take a minute to talk about them a little bit, as I think they are both quite interesting and both have the potential to be very worthwhile.
First, lets talk Crimson Slaughter. Now, I'm still under the opinion that its sort of dumb that they've gone and made a supplement for a Chaos Legion (or Chapter in this case) that didn't even exist two years ago when they still haven't done anything for any of the long standing Legions that already have large fan-bases that would undoubtedly be excited about this sort of thing.
However, I am very much enjoying this book so far. The fluff is fun and a little grandiose in classic Chaos style, and honestly, I think most of the rules and upgrades are fairly solid. The item that allows a Sorcerer to take Divination powers seems like it could be awesome (Forgefiend with Prescience could be really scary), and I really like the Horns that give you Hammer of Wrath, Rage and Furious Charge as well. The sword was decent, though I think probably a little pricy. Another interesting little thing about it is that all Crimson Slaughter units in your army have Fear, and while I think that fear is pretty much the most useless rule in the game, its fun to think that a Riptide could end up being afraid of a unit of cultists or something. The main downside is the cost. Here in Canada we're paying $60 for literally 2 pages of rules, so if you don't really care about the fluff you'd probably be disappointed in this purchase.
Now lets talk about the data slate. The slate comes with 3 formations on it that can be taken and they all involve Helbrutes. The first, the Mayhem Pack consists of 3 Helbrutes and gives them the ability to Deep Strike, which I think is just fantastic. In my game, I dropped in 3 Multi-Melta Brutes and they dropped down and caused some havoc in my opponent's back lines, and that's with me thinking that they were a Squadron. They're not, so instead I could have had 3 Helbrutes running amok separately as the normally would have if by some miracle they actually made it up the board. This can be a really killer formation as it can allow you to get your Helbrutes into position (relatively) safely and take out key targets, or blast apart things that would normally really threaten them before running around assaulting everything within arm's reach.
The second one I haven't tried yet, but I'd really like to. It's called the Helcult, and it sounds a little hilarious. You basically get a Helbrute and 2 units of Cultists who can run around together or on their own and they really support each other. The Cultists provide a 3+ cover save to the brute if they get in front of it, and in return they get to be Fearless. I can just imagine taking a big squad (20 - 30) of Cultists to soak shots and provide cover to the Brute while charging up the board while the other unit sits around on an objective being all Fearless and cool. I think I'd also want the Brute in a close combat loadout for this formation. Maybe dual Powerfist/Flamer or a Fist/Flamer and a Power Scourge. It really sounds like fun.
The third one is my least favorite, but I'd still like to try it out. The Helfist Murderpack was named after a 12 year old's Death Metal band and consists of 5 Helbrutes in a Squadron. One of these shmucks gets to be a character with a 5++ that can Look Out, Sir and as long as he's still alive you get to pick which brand of crazy your damaged Brutes get to be. That's pretty much all it is. I'm not too keen on it because its really expensive (minimum 500 points for 5 Helbrutes. I did the math for you.) and it doesn't do much to help them out, and in fact makes it so that a Las Predator can take out 3 Helbrutes in a turn instead of 1! Hooray! The only way I really see it working is either going "cheap" and just rushing some close combat or Multi-Melta guys at 'em and hoping for the best, or to really pull out all the stops and give them Lascannons and Missile Launchers and hiding behind a Defence Line, hopefully getting to fire frenzy the crap out of guys.
For the price of this Data-Slate it really gives you a lot of options and makes one of (in my humble opinion) the coolest units in the codex actually maybe viable. Still not necessarily competitive, but viable. If you are a Chaos Player and you can get this, I really think you should try to.
Anyways, that it for now. Stay tuned for more battle reports, reviews, and silly ramblings!
Monday, 24 March 2014
Wednesday, 19 March 2014
Warhammer 40K Battle Report: Chaos/Traitor Guard v.s White Scars/Tau
The local Imperial forces have been corrupted by the foul energies of Chaos and are rampaging across the sector. The White Scars with their Tau allies have come to put an end to the Chaos Taint
This was a 1750 battle between Brennan's Chaos Space Marines with Traitor Guard allies, and Todd's White Scars with Tau Allies. The Mission was the Scouring with the corner deployment.
The Armies
Chaos/Guard
HQ:
- Chaos Lord with Mark of Khorne, Juggernaut, Gift of Mutation, Melta Bombs, Sigil of Corruption,
Axe of Blind Fury, and Veterans of the Long War (Warlord) - 190
- Primaris Psyker (Allies) - 70
Troops:
- 10 Cultists with Autoguns - 60
- 10 Cultists with Autoguns - 60
- 10 Chaos Space Marines with 2x Plasma Guns and Melta Bombs - 175
- 10 Veterans with 3x Plasma Guns (Allies) - 115
Fast Attack:
- Heldrake with Baleflamer - 170
- Heldrake with Baleflamer - 170
- 3 Chaos Spawn with Mark of Khorne - 96
Heavy Support:
- Predator with Twin-Linked Lascannons, and Lascannon Sponsons - 140
- Basilisk Ordnance Battery with 3x Basilisk and Camo-Nets (Allies) - 435
Fortification:
- Aegis Defence Line with Coms Relay - 70
Total: 1751
This was an interesting list. It relied very heavily on the Basilisks and Drakes to do the heavy lifting. The Basilisks in particular weren't very tough and had the potential to explode early on if Todd had the right stuff to deal with them. The Lord could also serve as a pretty good Counter-Charge unit or distraction.
White Scars/Tau
HQ:
- Chapter Master on Bike with Lightning Claw and Power Fist - 190
- Captain with Lightning Claw, Power First, and Auspex - 130
- Command Squad with Apothecary. 4x Grav-Guns, and 4x Storm Shields in Drop Pod with Locator
Beacon - 260
- Cadre Fireblade (Allies) - 60
Elites:
- 3 Crisis Suits with 2x Plasma Rifle and 1 Fusion Blaster each (Allies) - 201
Troops:
- 5 Bikes with 2x Grav-Guns, and Melta Bombs - 140
- 5 Bikes with 2x Grav-Guns, and Melta Bombs - 140
- 3 Bikes with 2x Melta Guns and Melta Bombs - 88
- 12 Fire Warriors (Allies) - 108
-10 Fire Warriors (Allies) - 90
Fast Attack:
- 4 Pathfinders - 44
Heavy Support:
- 5 Devastators with 4x Heavy Bolters, Sergent with Combi-Grav and Signum - 80
- Hammerhead with Submunition Rounds - 131
Fortification:
- Aegis Defence Line with Icarus Lascannon - 85
Total: 1752
This was a typical Todd list with a twist. We have the standard core of White Scars Bikers fitted to the nines with Grav-Guns and a bunch of Fire Warriors behind a Defence Line with a Fireblade and Hammerhead. Where it deviates is in the lack of Las-Preds and with the addition of the Command Squad and the Crisis Team. The Command Squad has the potential to be pretty nasty, but with Brennan's list lacking much 3+ armour, he probably would have been better off with Melta. Of course, he couldn't have known that ahead of time, but with the amount of vehicles sitting around a bunch of Meltaguns dropping in could have done some really serious damage. The main advantage of this list I think, is in its number of Troops, most of which are quite mobile.
The Game
Brennan won the roll for first turn and decided to go first. He Deployed his Defence Line in the back corner of his deployment zone, with his tanks all behind it and his Primaris Psyker tucked behind one of the Basilisks out of sight. The Veterans went behind the Defence line as well, to make it as difficult as possible for Todd to Drop his Pod and blow something up easily. The Spawn and Lord went in front of the Defence Line a bit behind a building, and one squad of Cultists went behind the bunker in the center. The Infiltrating Marines and Cultists went behind the wreckage on the flank and building on the rock respectively.
In response, Todd Deployed his Fire Warriors behind his Defence Line in his corner with his Hammerhead in a bit of area terrain. Both big Bike Squads went on the flank closest to the Marines, and the Devastators went behind the Building on the Rock as much as they could. The Crisis Suits and Drop Pod went in reserve along with the 3 Bikes. He forgot he had Pathfinders and so they didn't take part in the battle. Presumably they were held up by a clever trap laid by cultists of the Dark Gods.
Turn 1
Todd failed to steal first turn, and there was no Night Fighting. Brennan begins by casting Prescience on his Basilisks to help direct their barrage where its needed. The Marines move forwards a bit to try and take some pot shots at the Bikes, while both Cultist units move to where they will be well hidden. With a thundering blast, the Basilisks open up on the Fire Warriors and kill a few from both squads, as well as destroying the Icarus Lascannon. The Marines take a few shots at the Bikes but fail to harm them. The Predator fires at the Hammerhead, but is unable to get through its armour. With that, Brennan ends his turn.
Todd begins by dropping his Drop Pod right in front of Brennan's Defence line. The Bike Squad with the Chapter Master moves towards the vehicles, whilst the other Bikes move towards the Marines. The Devastators move to try and get some line of sight on the nearby Cultists. Shooting Begins with all the Grav-Guns firing at the Predator, Immobilizing it and disabling its turret. The Hammerhead tries to finish it off, but hits the Defence Line instead. The Bikes shoot at the Marines and kill two. No assaults this turn.
Turn 2
Both Heldrakes arrive this turn, one Vector Striking the Devastators and causing them to start to flee, the other moving towards the Bike units. The Primaris Psyker Presciences the Basilisks again. The Cultists behind the Bunker move to get behind it better. The Spawn and Jugger Lord move towards the Command Squad, as do the Guardsmen.
The Basilisks open up again, and once again they blow up a bunch of Fire Warriors, but they hold. The Heldrake unleashes its Baleflamer on the Fireblade's unit, killing him along with several other Fire Warriors. The other Drake flames the Chapter Master's Squad, killing all but the Chapter Master and another Bike. The Veterans fire into the Command Squad and kill one Marine.
Assault Begins and the Spawn and Lord charge the Command Squad. The Lord gets Challenged out by the Sergent but rolls a 1 on his Daemon Weapon attacks and doesn't manage to kill him. The Spawn fare a little better and manage to kill a couple more Marines and only take a wound or two in return. The White Scars try and hit and run but roll a 6 on their initiative and get stuck.
The Crisis suits choose this moment to drop in and come in over by the Basilisks, hoping to blow them up. unfortunately, Brennan's Placement makes it tough for them to get into a good position to shoot the tanks. Both bike units move towards the Marines who are on a 3 point objective. The Hammerhead moves to try and get a better shot at the Predator, and the Fire Warriors try and get some rear shots on the Heldrake.
Shooting starts with both Bike units shooting at the Marines and killing a couple, who hold. The Crisis Suits decide to shoot the Guardsmen and kill the Sergent and all the Plasma Gunners. The Fire Warriors and Devastators both fail to harm the Heldrake, and the Hammerhead once again fails to destroy the Predator.
Assault continues with the Lord easily killing the Sergent, only to become a Spawn. One Spawn is killed as well, but another marine is killed. The Bikes, along with the Chapter Master Charge the Marines and easily kill them all. They fan out to try and mitigate the damage from the Heldrake.
Turn 3
Prescience is once again cast on the Basilisks who turn themselves to fire at the Crisis Suits, with one moving back to Heavy Flamer them. Both units of Cultists break cover and start heading for objectives, the ones in the center trying to get around the hill to the entrance of the Bunker, the others moving to try and beat up some Fire Warriors. The Heldrake by the Bikes Moves right into their midst, killing the last Bike from the Chapter Master's Squad with a Vector Strike. The other Heldrake Vector Strikes a few more Fire Warriors, but they hold.
The Basilisks open up on the Battlesuits, and kill 2, leaving one left with a single wound. Luckily, some skilled shooting from the Veterans manages to drop the last Suit. The Drake near the Bikes fires into them and kills 3, chasing the other 2 off the board. The other Heldrake kills a bunch more Fire Warriors from the Fireblade's squad and the last 2 start to run. The Cultists in the middle run and all other shooting was largely ineffective. In assault the slugfest continues with no one being able to get the upper hand. At the end the White Scars Hit n' Run.
Todd begins by regrouping the fleeing Fire Warriors, and bringing on his small bike squad. The other Squad moves towards the Cultists, hoping to kill a bunch, as does the Hammerhead. The Chapter Master Moves over the join up with the Captain and the Apothecary. In the shooting phase, the Fire Warriors and Hammerhead mercilessly gun down all but two cultists, who run for it. The Command Squad then assaults the Spawn, and once again, combat is a draw.
Turn 4
Prescince goes off again, and Cultists continue to run around, with the hurt squad running off the board. Both Heldrakes enter Hover Mode. The Basilisks decide they've had enough of the Hammerhead and blow it to smithereens. The Heldrake decides to torch a bunch more Fire Warriors, and both Squads start to cheese it. In the Assault a Spawn is killed.
Todd's Turn and the Bikes move up to melta the hovering Heldrake. Both units of Fire Warriors regroup. Brave little fellers. Firing their Meltaguns manages to get a Hullpoint off the Heldrake, thanks to its Daemonic Possession negating a stun. In the Assault phase the final Spawn finally bites it, and the Marines consolidate a bit.
Turn 5
The Barrage continues with Brennan Blowing the larger Fire Warrior squad off the map. The Lascannon from the Predator manages to punk the Captain, and the Heldrake kills 2 Bikes and one more Fire Warrior who runs again.
With it possibly being the last turn, the Bike moves to claim the 4 point objective in Todd's deployment zone. The Chapter Master rushes over to try and blow up the Heldrake. The Assault is declared, and he makes the charge, but only manages to strip two Hull Points off the Heldrake.
Total Points
Chaos/Guard: 8 (7 from Objectives, First Blood)
Marines/Tau: 7 (4 from Objectives, Slay the Warlord, Line Breaker, One Fast Attack Kill)
Post Game Thoughts
That was a really close game that hinged on Todd failing to destroy the Heldrake. Had he managed that it would have been a Space Marine Victory. Todd played his list pretty well, though he was always going to have a rough go against 2 Heldrakes. I think that I probably would have deployed the Melta Bikes and Turbo-Boosted them up right away to try and take out a vehicle or two, but they also would have made an easy target for First Blood. He also forgot to call in his Orbital Bombardment which really may have lost him the game. Those Basilisks were completely unprotected from it, and with a hit he could have taken out at least 2 of them, and probably the Primaris as well. Obviously, forgetting about his Pathfinders was also a big deal as well.
I think Brennan did a very good job with his deployment as he deployed in such a way as to make it difficult for Todd to get a favourable position with his Deep Strikers. He got pretty lucky with Prescience going off every time, and also with his scatter dice. Lots of times he didn't even need the re-roll. This was really countered by having his Lord become a Spawn pretty much right away though. Had he gotten something else he likely could have beaten down the Command Squad and then gone to take on the Chapter Master, but such is the life of a Lord of Chaos.
In the end I think both players played a solid game, and it was a lot of fun to watch and record.
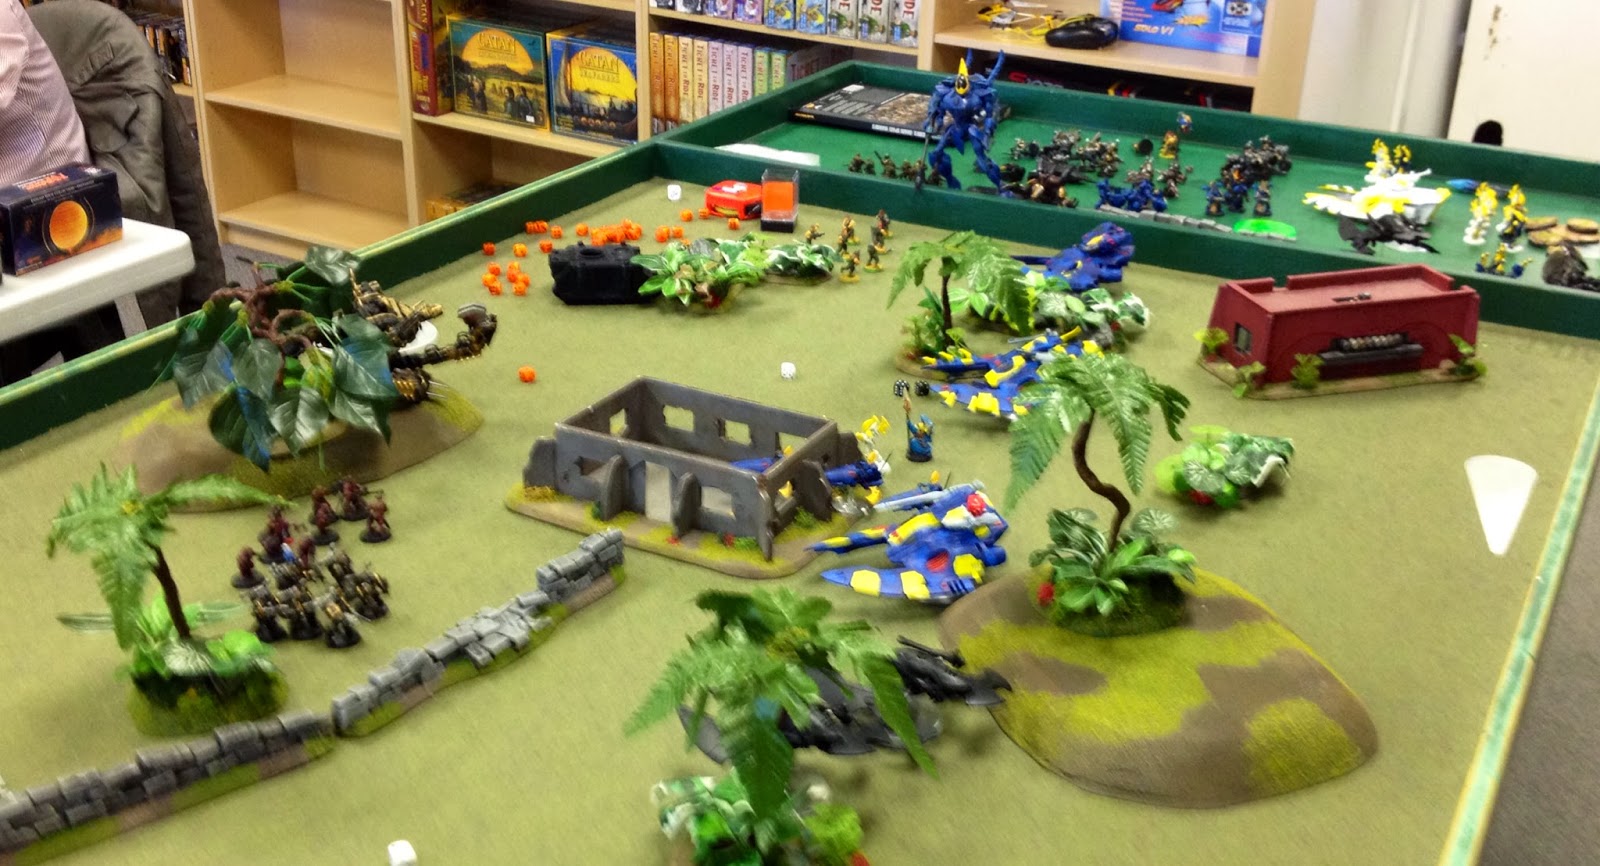
This was a 1750 battle between Brennan's Chaos Space Marines with Traitor Guard allies, and Todd's White Scars with Tau Allies. The Mission was the Scouring with the corner deployment.
 |
| The Game Floor |
The Armies
Chaos/Guard
HQ:
- Chaos Lord with Mark of Khorne, Juggernaut, Gift of Mutation, Melta Bombs, Sigil of Corruption,
Axe of Blind Fury, and Veterans of the Long War (Warlord) - 190
- Primaris Psyker (Allies) - 70
Troops:
- 10 Cultists with Autoguns - 60
- 10 Cultists with Autoguns - 60
- 10 Chaos Space Marines with 2x Plasma Guns and Melta Bombs - 175
- 10 Veterans with 3x Plasma Guns (Allies) - 115
Fast Attack:
- Heldrake with Baleflamer - 170
- Heldrake with Baleflamer - 170
- 3 Chaos Spawn with Mark of Khorne - 96
Heavy Support:
- Predator with Twin-Linked Lascannons, and Lascannon Sponsons - 140
- Basilisk Ordnance Battery with 3x Basilisk and Camo-Nets (Allies) - 435
Fortification:
- Aegis Defence Line with Coms Relay - 70
Total: 1751
This was an interesting list. It relied very heavily on the Basilisks and Drakes to do the heavy lifting. The Basilisks in particular weren't very tough and had the potential to explode early on if Todd had the right stuff to deal with them. The Lord could also serve as a pretty good Counter-Charge unit or distraction.
White Scars/Tau
HQ:
- Chapter Master on Bike with Lightning Claw and Power Fist - 190
- Captain with Lightning Claw, Power First, and Auspex - 130
- Command Squad with Apothecary. 4x Grav-Guns, and 4x Storm Shields in Drop Pod with Locator
Beacon - 260
- Cadre Fireblade (Allies) - 60
Elites:
- 3 Crisis Suits with 2x Plasma Rifle and 1 Fusion Blaster each (Allies) - 201
Troops:
- 5 Bikes with 2x Grav-Guns, and Melta Bombs - 140
- 5 Bikes with 2x Grav-Guns, and Melta Bombs - 140
- 3 Bikes with 2x Melta Guns and Melta Bombs - 88
- 12 Fire Warriors (Allies) - 108
-10 Fire Warriors (Allies) - 90
Fast Attack:
- 4 Pathfinders - 44
Heavy Support:
- 5 Devastators with 4x Heavy Bolters, Sergent with Combi-Grav and Signum - 80
- Hammerhead with Submunition Rounds - 131
Fortification:
- Aegis Defence Line with Icarus Lascannon - 85
Total: 1752
This was a typical Todd list with a twist. We have the standard core of White Scars Bikers fitted to the nines with Grav-Guns and a bunch of Fire Warriors behind a Defence Line with a Fireblade and Hammerhead. Where it deviates is in the lack of Las-Preds and with the addition of the Command Squad and the Crisis Team. The Command Squad has the potential to be pretty nasty, but with Brennan's list lacking much 3+ armour, he probably would have been better off with Melta. Of course, he couldn't have known that ahead of time, but with the amount of vehicles sitting around a bunch of Meltaguns dropping in could have done some really serious damage. The main advantage of this list I think, is in its number of Troops, most of which are quite mobile.
The Game
Brennan won the roll for first turn and decided to go first. He Deployed his Defence Line in the back corner of his deployment zone, with his tanks all behind it and his Primaris Psyker tucked behind one of the Basilisks out of sight. The Veterans went behind the Defence line as well, to make it as difficult as possible for Todd to Drop his Pod and blow something up easily. The Spawn and Lord went in front of the Defence Line a bit behind a building, and one squad of Cultists went behind the bunker in the center. The Infiltrating Marines and Cultists went behind the wreckage on the flank and building on the rock respectively.
 |
| Brennan's Deployment |
In response, Todd Deployed his Fire Warriors behind his Defence Line in his corner with his Hammerhead in a bit of area terrain. Both big Bike Squads went on the flank closest to the Marines, and the Devastators went behind the Building on the Rock as much as they could. The Crisis Suits and Drop Pod went in reserve along with the 3 Bikes. He forgot he had Pathfinders and so they didn't take part in the battle. Presumably they were held up by a clever trap laid by cultists of the Dark Gods.
 |
| Todd's Deployment |
Todd failed to steal first turn, and there was no Night Fighting. Brennan begins by casting Prescience on his Basilisks to help direct their barrage where its needed. The Marines move forwards a bit to try and take some pot shots at the Bikes, while both Cultist units move to where they will be well hidden. With a thundering blast, the Basilisks open up on the Fire Warriors and kill a few from both squads, as well as destroying the Icarus Lascannon. The Marines take a few shots at the Bikes but fail to harm them. The Predator fires at the Hammerhead, but is unable to get through its armour. With that, Brennan ends his turn.
Todd begins by dropping his Drop Pod right in front of Brennan's Defence line. The Bike Squad with the Chapter Master moves towards the vehicles, whilst the other Bikes move towards the Marines. The Devastators move to try and get some line of sight on the nearby Cultists. Shooting Begins with all the Grav-Guns firing at the Predator, Immobilizing it and disabling its turret. The Hammerhead tries to finish it off, but hits the Defence Line instead. The Bikes shoot at the Marines and kill two. No assaults this turn.
 |
| End of Turn 1 |
Turn 2
Both Heldrakes arrive this turn, one Vector Striking the Devastators and causing them to start to flee, the other moving towards the Bike units. The Primaris Psyker Presciences the Basilisks again. The Cultists behind the Bunker move to get behind it better. The Spawn and Jugger Lord move towards the Command Squad, as do the Guardsmen.
The Basilisks open up again, and once again they blow up a bunch of Fire Warriors, but they hold. The Heldrake unleashes its Baleflamer on the Fireblade's unit, killing him along with several other Fire Warriors. The other Drake flames the Chapter Master's Squad, killing all but the Chapter Master and another Bike. The Veterans fire into the Command Squad and kill one Marine.
Assault Begins and the Spawn and Lord charge the Command Squad. The Lord gets Challenged out by the Sergent but rolls a 1 on his Daemon Weapon attacks and doesn't manage to kill him. The Spawn fare a little better and manage to kill a couple more Marines and only take a wound or two in return. The White Scars try and hit and run but roll a 6 on their initiative and get stuck.
The Crisis suits choose this moment to drop in and come in over by the Basilisks, hoping to blow them up. unfortunately, Brennan's Placement makes it tough for them to get into a good position to shoot the tanks. Both bike units move towards the Marines who are on a 3 point objective. The Hammerhead moves to try and get a better shot at the Predator, and the Fire Warriors try and get some rear shots on the Heldrake.
Shooting starts with both Bike units shooting at the Marines and killing a couple, who hold. The Crisis Suits decide to shoot the Guardsmen and kill the Sergent and all the Plasma Gunners. The Fire Warriors and Devastators both fail to harm the Heldrake, and the Hammerhead once again fails to destroy the Predator.
Assault continues with the Lord easily killing the Sergent, only to become a Spawn. One Spawn is killed as well, but another marine is killed. The Bikes, along with the Chapter Master Charge the Marines and easily kill them all. They fan out to try and mitigate the damage from the Heldrake.
 | |
| End of Turn 2 |
Turn 3
Prescience is once again cast on the Basilisks who turn themselves to fire at the Crisis Suits, with one moving back to Heavy Flamer them. Both units of Cultists break cover and start heading for objectives, the ones in the center trying to get around the hill to the entrance of the Bunker, the others moving to try and beat up some Fire Warriors. The Heldrake by the Bikes Moves right into their midst, killing the last Bike from the Chapter Master's Squad with a Vector Strike. The other Heldrake Vector Strikes a few more Fire Warriors, but they hold.
The Basilisks open up on the Battlesuits, and kill 2, leaving one left with a single wound. Luckily, some skilled shooting from the Veterans manages to drop the last Suit. The Drake near the Bikes fires into them and kills 3, chasing the other 2 off the board. The other Heldrake kills a bunch more Fire Warriors from the Fireblade's squad and the last 2 start to run. The Cultists in the middle run and all other shooting was largely ineffective. In assault the slugfest continues with no one being able to get the upper hand. At the end the White Scars Hit n' Run.
Todd begins by regrouping the fleeing Fire Warriors, and bringing on his small bike squad. The other Squad moves towards the Cultists, hoping to kill a bunch, as does the Hammerhead. The Chapter Master Moves over the join up with the Captain and the Apothecary. In the shooting phase, the Fire Warriors and Hammerhead mercilessly gun down all but two cultists, who run for it. The Command Squad then assaults the Spawn, and once again, combat is a draw.
 |
| End of Turn 3 |
Turn 4
Prescince goes off again, and Cultists continue to run around, with the hurt squad running off the board. Both Heldrakes enter Hover Mode. The Basilisks decide they've had enough of the Hammerhead and blow it to smithereens. The Heldrake decides to torch a bunch more Fire Warriors, and both Squads start to cheese it. In the Assault a Spawn is killed.
Todd's Turn and the Bikes move up to melta the hovering Heldrake. Both units of Fire Warriors regroup. Brave little fellers. Firing their Meltaguns manages to get a Hullpoint off the Heldrake, thanks to its Daemonic Possession negating a stun. In the Assault phase the final Spawn finally bites it, and the Marines consolidate a bit.
 |
| End of Turn 4 |
Turn 5
The Barrage continues with Brennan Blowing the larger Fire Warrior squad off the map. The Lascannon from the Predator manages to punk the Captain, and the Heldrake kills 2 Bikes and one more Fire Warrior who runs again.
With it possibly being the last turn, the Bike moves to claim the 4 point objective in Todd's deployment zone. The Chapter Master rushes over to try and blow up the Heldrake. The Assault is declared, and he makes the charge, but only manages to strip two Hull Points off the Heldrake.
.jpeg) |
| End of Turn 5 |
.jpeg) |
| ...And the End of the Game |
Total Points
Chaos/Guard: 8 (7 from Objectives, First Blood)
Marines/Tau: 7 (4 from Objectives, Slay the Warlord, Line Breaker, One Fast Attack Kill)
Post Game Thoughts
That was a really close game that hinged on Todd failing to destroy the Heldrake. Had he managed that it would have been a Space Marine Victory. Todd played his list pretty well, though he was always going to have a rough go against 2 Heldrakes. I think that I probably would have deployed the Melta Bikes and Turbo-Boosted them up right away to try and take out a vehicle or two, but they also would have made an easy target for First Blood. He also forgot to call in his Orbital Bombardment which really may have lost him the game. Those Basilisks were completely unprotected from it, and with a hit he could have taken out at least 2 of them, and probably the Primaris as well. Obviously, forgetting about his Pathfinders was also a big deal as well.
I think Brennan did a very good job with his deployment as he deployed in such a way as to make it difficult for Todd to get a favourable position with his Deep Strikers. He got pretty lucky with Prescience going off every time, and also with his scatter dice. Lots of times he didn't even need the re-roll. This was really countered by having his Lord become a Spawn pretty much right away though. Had he gotten something else he likely could have beaten down the Command Squad and then gone to take on the Chapter Master, but such is the life of a Lord of Chaos.
In the end I think both players played a solid game, and it was a lot of fun to watch and record.
Wednesday, 26 February 2014
Chaos Daemons: First Impressions
Hey everyone! So last week I had a chance to play a game using my new Chaos Daemons army, and while I lost terribly, I do think that there's a lot of potential with the Codex, outside of screamerstar and Fateweaver shenanigans. In case anyone is wondering the list I took was this:
HQ:
- Bloodthirster - Greater Gift, Exalted Gift - 300
-Keeper of Secrets - 2x Greater Gift, Exhalted Gift, 3x Mastery Levels (Warlord) - 290
Troops:
- 12 Daemonettes - Instrument - 118
- 10 Daemonettes - 90
- 10 Plaguebearers 90
Heavy Support:
- Daemon Prince of Khorne - Greater Gift and Exhalted Gift, Flight, and Armour - 270
- Daemon Prince of Slaanesh - Greater Gift and Exhalted Gift, Flight, Armour, and 3x Mastery
Levels - 340
Total: 1498
Now I know that this is hardly a power list, but keep in mind that at this early stage my model selection for Daemons is still quite limited, and most of my points are in Daemon Princes and Greater Daemons (I love my monsters!). My plan was pretty much to try and just overwhelm him with Flying Monstrous Creatures, while the Keeper and Daemonettes advanced, with the Plaguebearers hanging out out of the way on an objective in cover. I took both the Grimoire and Portaglyph as well, and I got some decent gifts and psychic powers. The list that Todd brought happened to be pretty good for fighting this army, with 3 Bike units (2 with grav) and 2 units of Fire Warriors led by a Fireblade, and that many shots (many of which were twin-linked) is pretty great for grounding my critters.
My first big mistake that I made was, I think, diverting from my original plan. Instead of running the Daemonettes and Keeper of Secrets up the board like I originally was going to do, I put them in deep strike reserve. While they all came in turn 2 and the Keeper and one Daemonette unit landed right where I wanted (and thank goodness, because they were in very high risk places), one unit mishapped and went back into reserve. This meant that both the Keeper and the unit that got down were both shot up immediately and both died. If I had run up, the Keeper had Iron Arm, and so was likely to have made it close relatively unscathed, and honestly, if he had been shooting at the Daemonettes instead of the other creatures he probably would have had a bad time. Slaaneshi Daemons are also quite fast with fleet and adding 3" to their run moves, they probably would have been moving at least 12" a turn anyways.
The next big mistake I made was not being aggressive enough. I tried to fly up a flank to get behind a line of sight blocking building, but the Khorne Prince didn't make it and got blasted apart at the beginning of the second turn. To make things worse, he moved away from me and then I had to stay airborne for another turn instead of getting turn 2 assault that I would have gotten if I hadn't been stupid.
I think I'd like to try a similar list again, but in the future, I would probably drop the Exalted rewards for lesser rewards on the Princes, and I don't think I would take the Portaglyph. It just didn't do enough to make it worth it. It would also free up a few more points for a couple more Daemonettes or something, which would be nice.
As a final note, I feel like the Daemons book is a Codex that relies on the dice more than probably any other Codex, with the Warp Storm table being able to practically decimate your army in a single turn, or if it feels like being a cool guy, it could drop in a unit of troops for you. The fact that most of the results are going to be neutral, if not actively harmful to you certainly doesn't help. Still, it seems like the book could be a lot of fun, and it allows me to get a stupid amount of monsters on the table, so I do like that.
Monday, 17 February 2014
List Building Thoughts: Chaos Space Marines Part 2
A couple weeks ago I started talking about building a CSM army around close combat and started a unit analysis. Keep in mind that many of these choices are generally not seen as competitive, due to either a high points cost, or them taking up a slot that may be better used on another unit (Heldrakes). This is the sequel to that post. Chaos Space Marines 2: Chaos Harder
We've already talked about Spawn, Daemon Princes, and Kharn and Friends in the last post so now I'd like to move onto an often overlooked unit. Raptors. While these guys aren't spectacular, a big squad (10 or more) with Mark of Slaanesh and the Icon of Excess can be fairly potent. I like to give mine a couple Meltaguns, and Melta Bombs on the Champion so that they can threaten vehicles as well as infantry. MoS tends to work well on them as striking first can really be invaluable, especially when your squad has been whittled down a bit from taking a turn or two of fire, and the FnP from the Icon can really boost their survivability as well. The main problems that I've run into with Raptors is that they take up a Fast Attack slot, which competes with Heldrakes and Spawn, as well as still being relatively easy to kill. These things make it essential that you have something else jumping up the board with them that can better take the hits. Spawn, a Land Raider full of guys or more Raptors all could do this job fairly well. Target saturation is very key when running Raptors.
Our next contender is an old favorite of many, and most long time Chaos players will already have some of these guys in their army. Obliterators. Now while they're not a melee unit by any means, having some fire support is always a good thing, and you won't get the versatility that Obliterators offer anywhere else. I've been toying with the idea of deep striking them to come in turn 2 or 3 with their meltas and popping some vehicles, or blasting away at shooty infantry units hiding in the back with their plasmas or assault cannons. If you do this, they will attract quite a bit of fire, as nobody likes to have Obliterators running around their backfield, but if they're shooting at your Oblits, that means that something else is probably making it closer without taking fire, so they are a good distraction as well. Mark of Nurgle is pretty much essential on Oblits to give them Toughness 5 and keep them from being punked by stray Lascannon shots and the like.
I'm going to briefly go over our next fire support unit, because I think that by now everyone knows how stupidly potent they can be. Heldrakes. A turreted, torrent flamer with 6 strength and AP 3 is really nasty, and coupled with its good armour for a flyer, ability to hover, invulnerable save, vector strike, and it will not die, a Heldrake or two will really put the hurt on anything short of a 2+ save. The main downside to them is that they have to start in reserve and can be unreliable, and that many of your other fast choices also come from your Fast Attack slot.
Now that we've gone over the units that I like for a melee list in this edition, lets go over how to put them together into a list. The main thing we want, as I've said before, is Target Saturation. Have so many threats that you're opponent won't be able to effectively deal with all of them. This can be difficult, as many of these choices are quite expensive, which means that cultists are probably going to be your best bet for troops, since they're super cheap. The next thing to remember is that without some line of sight blocking terrain, a close combat army is going to have a tough time getting into combat against most opponents, but if even a unit or two of most of these things can make it in, a gunline style army is likely going to fold pretty hard.
The other thing to consider is the option of Daemon Allies. Regular readers may have read my battle reports featuring a Khorne themed list sporting a Bloodthirster with some Bloodletters alongside these other things we've talked about, just for some extra fast moving punch. Daemons tend to be nasty in combat, and come with the added flexibility of having the option to deep strike as well, so they really are worth a look.
Anyways, thanks everyone for reading my ramblings on this subject, and please feel free to leave comments and let me know if I've missed anything important (and relevant) about the subject.
Wednesday, 12 February 2014
Warhammer 40k Battle Report: Iyanden v.s Chaos Space Marines
The time has come once again for the Eldar of craftworld Iyanden to stomp out the threat of Chao. Descending on a jungle world to take and destroy an artifact of Chaos, the assembled warhost launches its attack...
This was a 2000 point game between my Eldar using the Iyanden supplement, and Brennan's Chaos Space Marines. The Mission was the Relic using Dawn of War Deployment.
The Armies
Iyanden
HQ:
- 2 Spiritseers - 140
Troops:
- 5 Dire Avengers in a Wave Serpent with Twin-Linked Scatter Lasers, Shuriken Cannon, and
Holo-Fields - 210
- 5 Wraithguard with D-Scythes in a Wave Serpent with Twin-Linked Scatter Lasers, Shuriken
Cannon, Holo-Fields, and Star Engines - 370
- 5 Wraithguard with D-Scythes in a Wave Serpent with Twin-Linked Scatter Lasers, Shuriken
Cannon, Holo-Fields, and Star Engines - 370
- 3 Jetbikes with Shuriken Cannon - 61
Fast Attack:
- 3 Hornets with Scatter Laser and Pulse Laser and Holo-Fields - 285
- 5 Warp Spiders with Exarch with Twin-Linked Deathspinner and Fast Shot - 120
Heavy Support:
- Fire Prism with Holo-Fields - 140
- Wraithknight with Suncannon and Scatter Laser (Warlord) - 300
Total: 1996
My goal with list was to try something different and use the Iyanden book as much as I could, while still being effective. Because of this, I decided to take my Wraithknight as my Warlord, although I wasn't sure it was a great idea, as a Wraithknight tends to draw enough fire without also giving up a victory point, and at 2000 points he should have plenty to deal with it with. The Spiritseers each took the Voice of Twilight power and one got the one that allows you to add 3" to your run and he other one got something that I never actually used.
Chaos Space Marines
HQ:
- Daemon Prince of Slaanesh with Power Armour, Wings, Black Mace, 3x Mastery Levels, Gift of
Mutation, and Spell Familiar (Warlord) - 360
- Sorcerer with Mark of Tzeentch with 3x Mastery Levels, Meltabombs, Gift of Mutation, Sigil of
Corruption, Scrolls of Magnus, and Spell Familiar - 225
Elites:
- 3 Chaos Terminators with Mark of Tzeentch, Combi-Meltas, 2x Lightning Claw and 1 Powerfist
-143
Troops:
- 10 Cultists - 50
- 10 Cultists - 50
- 10 Cultists - 50
- 15 Chaos Space Marines with Mark of Slaanesh, Icon of Excess, 2x Plasma Gun - 295
- 9 Thousand Sons with Meltabombs on the Sorcerer - 247
Fast Attack:
- 3 Chaos Bikers with Mark of Nurgle, 2x Meltagun - 108
Heavy Support:
- Predator with Twin-Linked Lascannon and Lascannon Sponsons - 140
- Predator with Twin-Linked Lascannon and Lascannon Sponsons - 140
- Defiler with Reaper Autocannon and Heavy Flamer - 195
Total: 2003
Man, there are a lot of bodies in this list. With over double the models in my army, I was going to have my work cut out for me, just in trying to whittle him down. Luckily, I feel there was a lot of points wasted here, particularily with giving the Sorcerer the Scrolls of Magnus, and giving the Terminators the Mark of Tzeentch and a Lightning Claw on each mook. I also would not have made the Daemon Prince my Warlord, as it was definitely going to be my highest priority target, as it could potentially run around smashing all my tanks if left unchecked.
The Game
Brennan won the roll to pick his side, and chose the side with the single hill in the center. He then won the roll for first turn and chose to go first. He deployed his Defiler on the Hill with a fairly commanding view of the field. His Predators went one on each flank so that there was nowhere I could hide that would be totally out of his Line of Sight. He then put his Prince in the center of the board to my right of the central building, and his Thousand Sons next to it. The Marines went on the other side of the building, along with the bikes, and his cultist went kind of scattered here and there.
In response, I hid my Fire Prism as best I could behind the only building in my deployment zone. With all 3 Wave Serpents lined up next to it right near the table edge. The Hornets went over by my central hill, ready to scout to wherever they were needed. Unsure of what to do with it, I plopped the Wraithknight down in front of the Wave Serpents to try and grant them some cover. The Bikes and Warp Spiders went into reserves.
Turn 1
We roll for Night Fighting, and it is night the first turn, which is very helpful for me, as I have plenty of ignores cover in my list. I fail to steal the initiative though. My Hornets Scout around a bit. Beginning the turn, the Daemon Prince takes off into the sky straight towards the Wraithknight. Taking careful aim with his Defiler he fires into the central Wave Serpent and manages to hit it and its neighbour, but thanks to Night Fighting nothing happens. His Predator then shoots at the Fire Prism, and despite a 2+ cover save manages to blow off the Prism Cannon. Cultists and Marines run up, and the Bikes Turbo-Boost. All other shooting is either too far away or ineffective.
With a Daemon Prince right in my face, I really needed to pull together and bring it down this turn. First I cast Voice of Twilight to give the Wraithknight Battle Focus then began shuffling around my skimmers, with only the Fire Prism moving very far. In the shooting phase everything, including the Knight and all of the Serpent Shields fire into the Daemon Prince, but manage to kill it, granting the Eldar both First Blood and Slay the Warlord.
Turn 2
With the crackle of energy, the Terminators teleport in right behind the Wraithknight. The Bikes move up to engage it as well, and the Cultists, Sons, and Marines all move forwards. Shooting Begins with the Terminators, Bikes, and one Predator firing into the Wraithknight, and thanks to some truly spectacular rolling on Brennan`s part, the Wraithknight is destroyed. The Defiler once again targets the middle Wave Serpent and this time gets a penetrating hit through, immobilizing it. The final Predator shoots into the Hornets and explodes one and gets a glancing hit on another. A pretty punishing turn.
Eager to avenge their Warlord, the Spirit Seer in the immobilized Serpent casts Quicken on his squad, while the other one casts Voice of Twilight. The Wraithguard then jump out of their immobilized ride and move towards the Terminators. The Fire Prism moves towards the cultists on the flank, hoping to harass them enough to get them to run away. The remaining vehicles just shuffle around. Using their new found vigour, the Wraithguard run nine inches towards the Terminators and unleash the fury of the warp upon them, easily killing all three. Shooting from all three Wave Serpents manages to kill six Thousand Sons, while the Hornets shoot into the Bikes, but only kill the Champion.
Turn 3
The Sorcerer begins by casting Enfeeble on the Wraithguard, which goes off. Seeing an opportunity to be rid of the Pesky Wave Serpents, the Bikes jet forwards towards the Dire Avengers` Serpent. The Marines enter the building ready to take the Relic, and the Cultists all just run towards the building. The remaining Sons then move towards the Wraithguard. The Predator on then turns its attention to the Fire Prism harassing the flank.
Shooting Begins with the Thousand Sons firing at the Wraithguard, destroying one, and the Defiler hitting a couple with the Battlecannon killing another two. The Predator fires at the Fire Prism, but it manages to jink out of the way. The Bikes shoot their Meltaguns, but only manage to get a single glance through, and the Predator on the far side of the table does nothing, thanks to the pilot jinking out of the way. The Bikes then assault, but only manage one more hull point, leaving the Serpent alive, but wounded.
With a Bust of energy from their Warp Jump Generators, the Warp Spiders deepstrike in behind the far Predator. From my board edge come the Jetbikes, who position themselves to destroy the remaining Bikes. Once again Quicken and Voice of Twilight are cast on the Wraithguard, and they move towards the Bikes, in case the Jetbikes can`t finish the job. The Wave Serpents shuffle a bit, and the Fire Prism Tank-Shocks the Cultists, who flee.
Loosening their mono-filiment nets onto the predator sees it wrecked, and the Warp Spiders Battle Focus over towards the Defiler. the Jetbikes shoot next, and thanks to Bladestorm manage to kill both Bikers. The Wraithguard then Run towards the remaining Sons, and kill the two Sons and the Aspiring Sorcerer, leaving just the Sorcerer alive. Shooting from the immobilized serpent sees the other predator wrecked, and the Wraithguard Serpent fires its scatter laser and shield into the Defiler, immobilizing it and reducing it to one hull point. The Dire Avengers`Wave Serpent then unloades on the Sorcerer, killing him as well, and the Hornets shoot at the building, killing both its occupants and pushing them off the relic.
Turn 4
The cultist on the run manage to rally and start to move back up the flank. Deciding to hunker down for a bit, the marines move up to the wall, ready to shoot the Hornets. The Cultists move forwards to engage and hopefully tie up the Wraithguard. With a blast from its Battlecannon, the Defiler manages to blow up the immobilized Serpent. Shooting from the Cultists near the Marines fails to hurt any Warp Spiders, and the Plasma Guns fail to do anything to the Hornets. The Cultists then assault the Wraithguard and lose combat before getting caught by the Wraithguard's sweeping advance.
The Warp Spiders attempt to jump towards the Marines, but get a double and lose the Exarch. The Jetbikes fly into the building and claim the Relic. The Wraithguard move up in support of the Bikes, while the remaining Wave Serpents and Hornets move around to get line of sight. Shooting at the Defiler fails, and the Wave Serpent is unable to wreck it this turn. The Hornets, Warp Spiders, and Wave Serpent all shoot into the Marines and kill a handful. The Fire Prism shoots the cultists, and they start to run again. The Warp Spiders assault the Marines, but lose combat and get swept in return. With possibly only one turn to go, and with him having not much left to threaten the Wave Serpents, we decide to call the game.
Total Points
Iyanden - 5 (Relic, Slay the Warlord, First Blood)
Chaos - 1 (Slay the Warlord)
Post-Game Thoughts
Yet another fun game with my Eldar, though I do sort of regret bringing so many Wave Serpents. Even though its far from the maximum that I could theoretically bring at this point level, even 3 are pretty hard to deal with, thanks to the sheer volume of fire they can put out. I do feel that Brennan could have played his list a little better. I would have probably held the Daemon Prince out of line of sight behind the building until the rest of my force got closer and maybe jumped him out turn 2. That way I would have not been able to afford to focus my entire army's shooting on it, and I may not have gotten First Blood and Slay the Warlord.
I do think that overall the dice were in my favour, though he did have one turn where he missed all of 3 shots he took, and wounded with pretty much everything. But overall, after that second turn my dice were average at worst.
In the future, I don't think I would take a Wraithknight as a Warlord, at least not at this point level. Its just too much of a priority target for most armies to also be worth a point, and at 2000 points there's a lot that can effectively deal with one. The Voice of Twilight power was fairly handy, but I think overall, I would prefer Conecal/Reveal most of the time, as shroud is always nice to have. I'll likely test the Iyanden book out a little bit more in the future, but right now, I don't see it being anything overly ground-breaking. As always, thanks for reading!
This was a 2000 point game between my Eldar using the Iyanden supplement, and Brennan's Chaos Space Marines. The Mission was the Relic using Dawn of War Deployment.
 |
| The Board |
The Armies
Iyanden
HQ:
- 2 Spiritseers - 140
Troops:
- 5 Dire Avengers in a Wave Serpent with Twin-Linked Scatter Lasers, Shuriken Cannon, and
Holo-Fields - 210
- 5 Wraithguard with D-Scythes in a Wave Serpent with Twin-Linked Scatter Lasers, Shuriken
Cannon, Holo-Fields, and Star Engines - 370
- 5 Wraithguard with D-Scythes in a Wave Serpent with Twin-Linked Scatter Lasers, Shuriken
Cannon, Holo-Fields, and Star Engines - 370
- 3 Jetbikes with Shuriken Cannon - 61
Fast Attack:
- 3 Hornets with Scatter Laser and Pulse Laser and Holo-Fields - 285
- 5 Warp Spiders with Exarch with Twin-Linked Deathspinner and Fast Shot - 120
Heavy Support:
- Fire Prism with Holo-Fields - 140
- Wraithknight with Suncannon and Scatter Laser (Warlord) - 300
Total: 1996
My goal with list was to try something different and use the Iyanden book as much as I could, while still being effective. Because of this, I decided to take my Wraithknight as my Warlord, although I wasn't sure it was a great idea, as a Wraithknight tends to draw enough fire without also giving up a victory point, and at 2000 points he should have plenty to deal with it with. The Spiritseers each took the Voice of Twilight power and one got the one that allows you to add 3" to your run and he other one got something that I never actually used.
 |
| Craftworld Iyanden |
Chaos Space Marines
HQ:
- Daemon Prince of Slaanesh with Power Armour, Wings, Black Mace, 3x Mastery Levels, Gift of
Mutation, and Spell Familiar (Warlord) - 360
- Sorcerer with Mark of Tzeentch with 3x Mastery Levels, Meltabombs, Gift of Mutation, Sigil of
Corruption, Scrolls of Magnus, and Spell Familiar - 225
Elites:
- 3 Chaos Terminators with Mark of Tzeentch, Combi-Meltas, 2x Lightning Claw and 1 Powerfist
-143
Troops:
- 10 Cultists - 50
- 10 Cultists - 50
- 10 Cultists - 50
- 15 Chaos Space Marines with Mark of Slaanesh, Icon of Excess, 2x Plasma Gun - 295
- 9 Thousand Sons with Meltabombs on the Sorcerer - 247
Fast Attack:
- 3 Chaos Bikers with Mark of Nurgle, 2x Meltagun - 108
Heavy Support:
- Predator with Twin-Linked Lascannon and Lascannon Sponsons - 140
- Predator with Twin-Linked Lascannon and Lascannon Sponsons - 140
- Defiler with Reaper Autocannon and Heavy Flamer - 195
Total: 2003
Man, there are a lot of bodies in this list. With over double the models in my army, I was going to have my work cut out for me, just in trying to whittle him down. Luckily, I feel there was a lot of points wasted here, particularily with giving the Sorcerer the Scrolls of Magnus, and giving the Terminators the Mark of Tzeentch and a Lightning Claw on each mook. I also would not have made the Daemon Prince my Warlord, as it was definitely going to be my highest priority target, as it could potentially run around smashing all my tanks if left unchecked.
 |
| Chaos Space Marines |
The Game
Brennan won the roll to pick his side, and chose the side with the single hill in the center. He then won the roll for first turn and chose to go first. He deployed his Defiler on the Hill with a fairly commanding view of the field. His Predators went one on each flank so that there was nowhere I could hide that would be totally out of his Line of Sight. He then put his Prince in the center of the board to my right of the central building, and his Thousand Sons next to it. The Marines went on the other side of the building, along with the bikes, and his cultist went kind of scattered here and there.
 |
| Brennan`s Deployment |
In response, I hid my Fire Prism as best I could behind the only building in my deployment zone. With all 3 Wave Serpents lined up next to it right near the table edge. The Hornets went over by my central hill, ready to scout to wherever they were needed. Unsure of what to do with it, I plopped the Wraithknight down in front of the Wave Serpents to try and grant them some cover. The Bikes and Warp Spiders went into reserves.
 |
| My Deployment |
Turn 1
We roll for Night Fighting, and it is night the first turn, which is very helpful for me, as I have plenty of ignores cover in my list. I fail to steal the initiative though. My Hornets Scout around a bit. Beginning the turn, the Daemon Prince takes off into the sky straight towards the Wraithknight. Taking careful aim with his Defiler he fires into the central Wave Serpent and manages to hit it and its neighbour, but thanks to Night Fighting nothing happens. His Predator then shoots at the Fire Prism, and despite a 2+ cover save manages to blow off the Prism Cannon. Cultists and Marines run up, and the Bikes Turbo-Boost. All other shooting is either too far away or ineffective.
With a Daemon Prince right in my face, I really needed to pull together and bring it down this turn. First I cast Voice of Twilight to give the Wraithknight Battle Focus then began shuffling around my skimmers, with only the Fire Prism moving very far. In the shooting phase everything, including the Knight and all of the Serpent Shields fire into the Daemon Prince, but manage to kill it, granting the Eldar both First Blood and Slay the Warlord.
 |
| End of Turn 1 |
Turn 2
With the crackle of energy, the Terminators teleport in right behind the Wraithknight. The Bikes move up to engage it as well, and the Cultists, Sons, and Marines all move forwards. Shooting Begins with the Terminators, Bikes, and one Predator firing into the Wraithknight, and thanks to some truly spectacular rolling on Brennan`s part, the Wraithknight is destroyed. The Defiler once again targets the middle Wave Serpent and this time gets a penetrating hit through, immobilizing it. The final Predator shoots into the Hornets and explodes one and gets a glancing hit on another. A pretty punishing turn.
Eager to avenge their Warlord, the Spirit Seer in the immobilized Serpent casts Quicken on his squad, while the other one casts Voice of Twilight. The Wraithguard then jump out of their immobilized ride and move towards the Terminators. The Fire Prism moves towards the cultists on the flank, hoping to harass them enough to get them to run away. The remaining vehicles just shuffle around. Using their new found vigour, the Wraithguard run nine inches towards the Terminators and unleash the fury of the warp upon them, easily killing all three. Shooting from all three Wave Serpents manages to kill six Thousand Sons, while the Hornets shoot into the Bikes, but only kill the Champion.
 |
| End of Turn 2 |
Turn 3
The Sorcerer begins by casting Enfeeble on the Wraithguard, which goes off. Seeing an opportunity to be rid of the Pesky Wave Serpents, the Bikes jet forwards towards the Dire Avengers` Serpent. The Marines enter the building ready to take the Relic, and the Cultists all just run towards the building. The remaining Sons then move towards the Wraithguard. The Predator on then turns its attention to the Fire Prism harassing the flank.
Shooting Begins with the Thousand Sons firing at the Wraithguard, destroying one, and the Defiler hitting a couple with the Battlecannon killing another two. The Predator fires at the Fire Prism, but it manages to jink out of the way. The Bikes shoot their Meltaguns, but only manage to get a single glance through, and the Predator on the far side of the table does nothing, thanks to the pilot jinking out of the way. The Bikes then assault, but only manage one more hull point, leaving the Serpent alive, but wounded.
With a Bust of energy from their Warp Jump Generators, the Warp Spiders deepstrike in behind the far Predator. From my board edge come the Jetbikes, who position themselves to destroy the remaining Bikes. Once again Quicken and Voice of Twilight are cast on the Wraithguard, and they move towards the Bikes, in case the Jetbikes can`t finish the job. The Wave Serpents shuffle a bit, and the Fire Prism Tank-Shocks the Cultists, who flee.
Loosening their mono-filiment nets onto the predator sees it wrecked, and the Warp Spiders Battle Focus over towards the Defiler. the Jetbikes shoot next, and thanks to Bladestorm manage to kill both Bikers. The Wraithguard then Run towards the remaining Sons, and kill the two Sons and the Aspiring Sorcerer, leaving just the Sorcerer alive. Shooting from the immobilized serpent sees the other predator wrecked, and the Wraithguard Serpent fires its scatter laser and shield into the Defiler, immobilizing it and reducing it to one hull point. The Dire Avengers`Wave Serpent then unloades on the Sorcerer, killing him as well, and the Hornets shoot at the building, killing both its occupants and pushing them off the relic.
 |
| End of Turn 3 |
Turn 4
The cultist on the run manage to rally and start to move back up the flank. Deciding to hunker down for a bit, the marines move up to the wall, ready to shoot the Hornets. The Cultists move forwards to engage and hopefully tie up the Wraithguard. With a blast from its Battlecannon, the Defiler manages to blow up the immobilized Serpent. Shooting from the Cultists near the Marines fails to hurt any Warp Spiders, and the Plasma Guns fail to do anything to the Hornets. The Cultists then assault the Wraithguard and lose combat before getting caught by the Wraithguard's sweeping advance.
The Warp Spiders attempt to jump towards the Marines, but get a double and lose the Exarch. The Jetbikes fly into the building and claim the Relic. The Wraithguard move up in support of the Bikes, while the remaining Wave Serpents and Hornets move around to get line of sight. Shooting at the Defiler fails, and the Wave Serpent is unable to wreck it this turn. The Hornets, Warp Spiders, and Wave Serpent all shoot into the Marines and kill a handful. The Fire Prism shoots the cultists, and they start to run again. The Warp Spiders assault the Marines, but lose combat and get swept in return. With possibly only one turn to go, and with him having not much left to threaten the Wave Serpents, we decide to call the game.
 |
| End of Turn 4 |
Total Points
Iyanden - 5 (Relic, Slay the Warlord, First Blood)
Chaos - 1 (Slay the Warlord)
Post-Game Thoughts
Yet another fun game with my Eldar, though I do sort of regret bringing so many Wave Serpents. Even though its far from the maximum that I could theoretically bring at this point level, even 3 are pretty hard to deal with, thanks to the sheer volume of fire they can put out. I do feel that Brennan could have played his list a little better. I would have probably held the Daemon Prince out of line of sight behind the building until the rest of my force got closer and maybe jumped him out turn 2. That way I would have not been able to afford to focus my entire army's shooting on it, and I may not have gotten First Blood and Slay the Warlord.
I do think that overall the dice were in my favour, though he did have one turn where he missed all of 3 shots he took, and wounded with pretty much everything. But overall, after that second turn my dice were average at worst.
In the future, I don't think I would take a Wraithknight as a Warlord, at least not at this point level. Its just too much of a priority target for most armies to also be worth a point, and at 2000 points there's a lot that can effectively deal with one. The Voice of Twilight power was fairly handy, but I think overall, I would prefer Conecal/Reveal most of the time, as shroud is always nice to have. I'll likely test the Iyanden book out a little bit more in the future, but right now, I don't see it being anything overly ground-breaking. As always, thanks for reading!
Wednesday, 5 February 2014
List Building Thoughts: Chaos Space Marines Part 1
Hey everyone. Today I'd like to talk a little more about building lists with everyone's favorite traitors, the Chaos Space Marines. Now, its no secret that CSM are generally considered a mid to low tier codex right now, so how can we best leverage what we have to our advantage? Please keep in mind that while some of these units and tactics work in my meta, they may not work for you, and they may not be the most competitive tactics in the world.
So firstly we need to decide what kind of list we want. For the most part, I would disregard trying to build an overly shooty list with these guys. We just simply don't seems to have the firepower to compete with the top-tier dexes in a shooting war. This leaves us with an assault based list, and while assault can be powerful this edition, it definitely comes with its challenges and downsides (casualties from the front, overwatch, needing an effective delivery system etc.) Luckily, assault is something our boys can do quite well, if we can get them into a position to do so.
Now that we've chosen an assault list, we have to consider an effective delivery system. We need to use units that are either fast on their own, or units with access to transports to drive them at the enemy. I've already talked about our options when in comes to transports in another post, and based on what we're trying to do, I would go with Landraiders for transports. Of course the downside is that these things are expensive, and coupled with the squad inside, you're likely to have close to 500 points tied up right there. If you play at 1500 points like I tend to, this is a large part of your army, so we're probably going to rely on cheap scoring units in the form of cultists.
With this established, we need to look at the units available to us that can do stuff in melee, or that can support a melee army. The first thing that comes to my mind are Spawn, preferably with the Mark of Nurgle. These little creeps are fast, thanks to being beasts who are also fleet, and they're also very tough, despite the lack of armour save. Even if you're getting shot the whole way up the board (a trip that should take you about 2 turns at the most) you're still probably going to have something survive to make combat, and if they're focusing that much on your Spawn, that's allowing one of your other units to make it in relatively unmolested. Once we get to combat we have potential for a huge number of attacks at a pretty high strength. Thanks to Spawn having d6 attacks (+2 on the charge from rage) we can get between 15 and 40 strength 5 attacks on the charge, which may or may not be poisoned. Not too shabby.
Our next good option is the flying Daemon Prince. While these guys are pretty expensive, they're fast and can easily eat a unit a turn if they can make it to combat. I would run one with either the Black Mace or the Axe of Blind Fury depending on whether or not you take a Khorne Prince. With their wings, they also have the benefit of being hard to hit, which unless you're playing Tau with lots of Skyfire, can mean that your FMC can make it into combat without even taking a wound. The main thing that I find kills these guys is in after you have wiped out your unit. Once he's left alone on the board, he's going to go down, unless you get lucky and get Iron Arm and or Endurance on him. This means that you need to either hold him back until other things get locked in, or bring enough stuff that you can get most of the opponent's army locked in combat.
Another unit that has worked well for me in the past is one that I affectionately call "Kharn and Friends". Kharn and friends is just what it sounds like. Kharn the Betrayer with a unit of either Berzerkers, or Fauzerkers (regular marines with MoK and possible the Icon of Wrath) inside a Landraider with Dozer Blade and Dirge Caster. This is a pretty pricy unit, but they tend to be pretty effective. I've been finding that people aren't taking all that much anti-AV14 in their lists in this edition, making it more likely that your Landraider will survive at least long enough to get Kharn and, by extension, his friends, to where they need to be. Once they hop out, there's not alot that can stand up to that assault. Kharn gets a meaty 7 strength 7 ap 2 attacks on the charge which hit on 2s (and if he's your warlord re-roll) with armourbane, meaning pretty much any unit or vehicle you throw him at is going to have a bad time. His buddies are really just there to soak hits and in the Champion's case, issue and accept challenges, so don't be overly upset when they die.
Anyways, this article is starting to get lengthy so I'm going to leave you all hanging here for now. We'll continue talking about the individual units and ways to combine them in a post next week! Stay tuned!
Tuesday, 4 February 2014
Warhammer 40k Battle Report: Eldar V.S White Scars/Dark Angels
Once more the arrogant Mon'Keigh have invaded a maiden world rightfully belonging to the Eldar. A strikeforce has been sent through the webway to deal with the threat and teach the barbaric humans a lesson they won't soon forget.
This was a 1550 point game between my Eldar and Todd's White Scars/Dark Angels Space Marines. The mission was Big Guns Never Tire with 4 Objectives and using the Dawn of War deployment type.
The Armies
Eldar
HQ:
- Autarch with Banshee Mask, Fusion Gun, Laser Lance, Mantle of the Laughing God, and a Jetbike
(Warlord) - 150
- Spirit Seer - 70
Troops:
- 5 Dire Avengers in a Wave Serpent with Holo-Fields, Shuriken Cannon and Twin-Linked Scatter
Lasers - 210
- 5 Wraithguard with D-Scythes in a Wave Serpent with Holo-Fields, Shuriken Cannon and
Twin-Linked Scatter Lasers - 355
- 3 Jetbikes with 1 Shuriken Cannon - 61
Heavy Support:
- Wraithknight with Scatter Laser, Suncannon and Scattershield - 300
- Wraithknight with Scatter Laser and Heavy Wraithcannons - 260
- Fire Prism with Holo-Fields - 140
Total: 1546
This list was kind of a fun list to see how two Wraithknights would do. I was definitely skeptical that the dual Heavy Wraithcannons would be worth taking, but I wanted to test it out, as with a little luck I could use them to wreck some vehicles or something. I also wanted to try out the Mantarch again, as in a previous game against Brennan he really did spectacularly, trolololing around the board with his Fusion Gun and just generally being a nuisance. Mainly I was concerned about my lack of models, as so many points were tied up in the Wraithknights.
White Scars/Dark Angels
HQ:
- Kor'Sarro Khan on Moondraken (Warlord) - 150
- Sammael on Saberclaw (Allied) - 200
Elite:
- Ironclad Dreadnought with Powerfist (Heavy Flamer), Seismic Hammer (Meltagun) in Drop Pod
- 190
- 5 Assault Terminators with Thunderhammers and Storm Shields in a Landraider Redeemer with
Dozer Blade - 470
Troops:
- 5 Bikes with 2x Grav Guns - 140
- 5 Bikes with 2x Meltaguns - 130
- 6 Scouts with Camo Cloaks, Sniper Rifles, and Sergent (Allied) - 98
Fast Attack:
- Dark Shroud (Allied) - 80
Fortification:
- Aegis Defence Line with Quad Gun - 100
Total: 1553
This list was quite mobile, and could almost even match me for mobility. I wasn't overly concerned with the Darkshroud as I knew that my Serpent Shields would be able to make short work of it, and he didn't have much in the way of long range shooting that could threaten them. The Termies could prove to be a problem if I was unable to take down the Land Raider early on. Hopefully the Wraithcannons and Fire Prism would be able to deal with it so that I could nuke the Termies with the Suncannon and Wraithguard.
The Game
Todd won the roll for table sides and took the side with the forests. I won the roll for first turn and elected to go first. I deployed my Fire Prism and the Wraitcannon Knight behind the hill in order to get a bit of cover from whatever shooting he would send my way. The other Wraithknight went behind the other building with the two Wave Serpents while the Mantarch went on the far flank obscured by a building, hoping to boost forwards to threaten the Scouts right away. The Bikes went in reserve.
Todd Deployed his Defence line in the center of the board, and put his Scouts behind it. The Landraider deployed on the same flank as the rest of my army, flanked by both units of Bikes and Khan, and with the Darkshroud behind it to give out cover saves. Sammael and the Ironclad went in reserve.
Turn 1
Todd begins by scouting up his Landraider and bikes a bit, along with the Darkshroud to get some jink saves and stuff. The Melta Bikes move in front of the Raider to grant it cover with their own bodies. Wasteful Mon'Keigh. The Wave Serpents move to my left to get away from the approaching Marines and get a better shot at the Darkshroud. The Suncannon Wraithknight goes with them, and the Cannon Knight moves over as well. The Fire Prism shuffles a bit to get a jink, and hopefully out of assault range on his turn.
Shooting begins with the Wave Serpents firing their Shields into the Darkshroud, which explodes under the weight of fire, granting the Eldar First Blood. Next comes the Wraithknight who fires its Heavy Wraithcannons into the Landraider, and despite two hits, it fails to get even a glance through. The Suncannon Knight shoots into Khan's Bike Squad and kills one. The Fire Prism tries to do the same, but scatters badly and does no damage. The Mantarch Turbo-Boosts right up to the Scouts.
The Marines respond by jetting forwards. The Melta Bikes bank hard to go deal with the pesky Solitaire harassing their recruits. Meanwhile the Landraider and the Grav Bikes keep their course and move straight towards the Fireprism and Wraithcannon toting Wriathknight. Streaking through the heavens comes the Drop Pod which manages to land directly behind the Fire Prism.
The Ironclad Dreadnought steps out of its transport and fires the Meltagun into the rear of the Fire Prism, but the pilot jinks out of the way. In anger, it fires the Heavy Flamer which Ignites the Fire Prisms engine fuel, causing it to explode. The Grav Bikes fire their Grav Guns into the Wraithknight, but do a bad job and only manage to get one wound through. The Scouts and Melta Bikes all fire everything they have at the giggling Solitaire, but his trickery keeps him safe from all harm.
Enraged by the alien's mockery, the Space Marines charge the Autarch, and though the Sergent decides not to accept the Solitaire's challenge, combined attacks from the scouts and bikers do a wound to the Mantarch, who manages to do absolutely nothing in return. Having had enough of this combat, the Solitaire hit and runs off back the way he came, while the White Scars go the other direction, attempting to get behind a building.
Turn 2
Seeing that the Space Marines are closing quickly, the Eldar continue to move away, with the Wave Serpents Turbo-Boosting away. The Suncannon Wraithknight moves to get line of sight on the Melta Bikes. The Wraithcannon Wraithknight Moves away from the Dreadnought, hoping to target the Landraider again. The Jetbikes boost onto the field, and Turbo-Boost up towards the Scouts.
Once again, the Wraithcannons fire into the Landraider, and once again they fail to do anything. The Suncannon Knight unleashes the devastating power of its weapon on the Melta Bikes clustered behind the building, and slaughters them to a man.The Mantarch Turbo-Boosts away from the scouts.
Eager to put an end to the aliens, Sammael deep strikes in next to the Drop Pod. The Bikes drive up and the Landraider unloads its cargo, who move towards the Wraithcannon Knight. Firing everything they have at the Wraithknight has little effect, only doing one more wound to the construct. The Scouts shoot the Quad gun and their Sniper Rifles into the Jetbikes and manage to kill all three of them. The Terminators then charge the Knight and though they lose one of their number, they manage to down it, and move off towards the Wave Serpents.
Turn 3
The dire avengers jump out of their Wave Serpent to fire on the Terminators. The Wraithguard Serpent moves away, as does the Dire Avenger Wave Serpent which turns to face the Terminators. The Wraithknight jumps forwards to shoot at the Scouts.
The Dire Avengers kick things off by unloading their guns into the Terminators, killing two. Both Wave Serpents follow suit, and under the barrage of lasers, energy fields, and shuriken, the Terminators are killed. The Wraithknight once again fires its Suncannon, this time into the scouts, killing 2 of them. The Solitaire boosts up behind the Scouts again, ready to fight them.
Moving around to try and get a shot on the flighty Eldar, the Bikes and Landraider drive towards the Wraithknight. Sammael follows suit, and the Dreadnought lumbers towards the tanks impotently. Firing everything they have at the Wraithknight only does a single wound to the construct, and the snap-firing Scouts fail to hurt the Autarch
Turn 4
Moving forward the Wraithknight walks towards the Landraider. The Dire Avengers' Wave Serpent cruises over to help deal with the Bikes while the Wraithguard Serpent drives up to hopefully damage the Ironclad with its shield. The Dire Avengers move towards the objective by the cairne.
Unloading its guns on the Bikes, the Wave Serpent manages to kill three of them, leaving just one bike and Khan left. The other Serpent only does one glance to the Ironclad. The Wraithknight charges the Landraider and manages to Immobilize it and do one Hullpoint. The Solitaire assaults the Scouts, and fails to do any damage but takes none himself.
The Ironclad moves over towards the Wraithknight bashing against the Landraider, as do Sammael and Khan. The Lone Biker moves over towards the objective behind the hill. Shooting does no damage to the Wraithknight. Khan then charges the Wraithknight, who crushes him beneath its huge foot. Once again the Mantarch combat is a slap fight, and to make things worse, he fails to hit and run away.
Turn 5
Once again the Wave Serpents move around, the Wraithguard one moving towards the Objective near the Bike to try and claim or contest it if there's another turn. Shooting their shields into the Ironclad only does one more hullpoint to it. In assault the Mantarch once again whiffs and the Wraithknight only does one hull point to the Landraider.
Seeing an opportunity, Sammael moves to shoot at the Dire Avengers, while the Dreadnought moves into assault range of the Wraithknight. Firing the Assault Cannon and Heavy Bolter with Sammael kills 4 of the 5 Dire Avengers. The Landraider fires its Assault Cannon into the last one and kills him off as well. The Dreadnought assaults the Wraithknight who whiffs yet again. The Dreadnought does one wound in turn. Again, the slap fight between the Scouts and the Autarch continues. We roll for game length, and the game ends this turn.
Total Points
Eldar - 6 (One Objective, First Blood, Slay the Warlord, Line Breaker)
Space Marines - 6 (One Objective, Line Breaker, Two Heavy Kills)
Post-Game Thoughts
That was a really fun game, although I think I really could have played it much better. I made some mistakes at the end of the game, and it definitely cost me a win. I should have moved the Wraithguard onto the objective held by my Dire Avengers to ensure that I would have it at the end of the game. I also shouldn't have Turbo-Boosted my Mantarch away from the Scouts turn 2, but I made the mistake of doing it before I fired my Suncannon. Had I fired the Suncannon first I could have assaulted the Scouts Turn 2 and possibly done something to them, maybe even wiping them off the objective, and probably keeping my bikes alive to claim it.
I also had some poor luck in the last two turns of the game, between not killing the Landraider when I assaulted it, and my Mantarch failing its hit and run turn 4. If the game had not ended turn 5 I almost certainly have been able to take the Biker off of my objective as well. Such is the nature of the game though, and had I not made so many tactical blunders these things wouldn't have mattered at all.
I think Todd played his list well as well, though I'm not sure moving his Bike Squad off to fight my Mantarch was wise, as had I managed to roll a bit better in combat, it could have done some damage to them, not to mention the fact that it put them in a position to be annihilated by the Suncannon.
I would have to say my Suncannon Wraithknight was easily my MVP this game, between blasting the Bike squad, killing some Scouts, beating the shit out of Khan, and punching up a Landraider, he did some serious damage. I definitely wouldn't take the dual Heavy Wraithcannon Wraithknight again. The lack of invulnerable save really is a big down side to it, as anything that can really hurt a Wraithknight is ignoring your save anyways. I also don't find the Wraithcannons to be very reliable, though not rolling well to penetrate didn't help my opinion of it. The Mantarch didn't do much either, but that's largely bad rolling as much as anything else. There also wasn't much in the way of vehicles for him to pop, so that didn't help.
Overall it was a fun game and I feel like I learned a lot. As always, thanks for reading.
This was a 1550 point game between my Eldar and Todd's White Scars/Dark Angels Space Marines. The mission was Big Guns Never Tire with 4 Objectives and using the Dawn of War deployment type.
 |
| The Game Board |
Eldar
HQ:
- Autarch with Banshee Mask, Fusion Gun, Laser Lance, Mantle of the Laughing God, and a Jetbike
(Warlord) - 150
- Spirit Seer - 70
Troops:
- 5 Dire Avengers in a Wave Serpent with Holo-Fields, Shuriken Cannon and Twin-Linked Scatter
Lasers - 210
- 5 Wraithguard with D-Scythes in a Wave Serpent with Holo-Fields, Shuriken Cannon and
Twin-Linked Scatter Lasers - 355
- 3 Jetbikes with 1 Shuriken Cannon - 61
Heavy Support:
- Wraithknight with Scatter Laser, Suncannon and Scattershield - 300
- Wraithknight with Scatter Laser and Heavy Wraithcannons - 260
- Fire Prism with Holo-Fields - 140
Total: 1546
This list was kind of a fun list to see how two Wraithknights would do. I was definitely skeptical that the dual Heavy Wraithcannons would be worth taking, but I wanted to test it out, as with a little luck I could use them to wreck some vehicles or something. I also wanted to try out the Mantarch again, as in a previous game against Brennan he really did spectacularly, trolololing around the board with his Fusion Gun and just generally being a nuisance. Mainly I was concerned about my lack of models, as so many points were tied up in the Wraithknights.
 |
| Eldar Strike Force |
HQ:
- Kor'Sarro Khan on Moondraken (Warlord) - 150
- Sammael on Saberclaw (Allied) - 200
Elite:
- Ironclad Dreadnought with Powerfist (Heavy Flamer), Seismic Hammer (Meltagun) in Drop Pod
- 190
- 5 Assault Terminators with Thunderhammers and Storm Shields in a Landraider Redeemer with
Dozer Blade - 470
Troops:
- 5 Bikes with 2x Grav Guns - 140
- 5 Bikes with 2x Meltaguns - 130
- 6 Scouts with Camo Cloaks, Sniper Rifles, and Sergent (Allied) - 98
Fast Attack:
- Dark Shroud (Allied) - 80
Fortification:
- Aegis Defence Line with Quad Gun - 100
Total: 1553
This list was quite mobile, and could almost even match me for mobility. I wasn't overly concerned with the Darkshroud as I knew that my Serpent Shields would be able to make short work of it, and he didn't have much in the way of long range shooting that could threaten them. The Termies could prove to be a problem if I was unable to take down the Land Raider early on. Hopefully the Wraithcannons and Fire Prism would be able to deal with it so that I could nuke the Termies with the Suncannon and Wraithguard.
 |
| Space Marines |
Todd won the roll for table sides and took the side with the forests. I won the roll for first turn and elected to go first. I deployed my Fire Prism and the Wraitcannon Knight behind the hill in order to get a bit of cover from whatever shooting he would send my way. The other Wraithknight went behind the other building with the two Wave Serpents while the Mantarch went on the far flank obscured by a building, hoping to boost forwards to threaten the Scouts right away. The Bikes went in reserve.
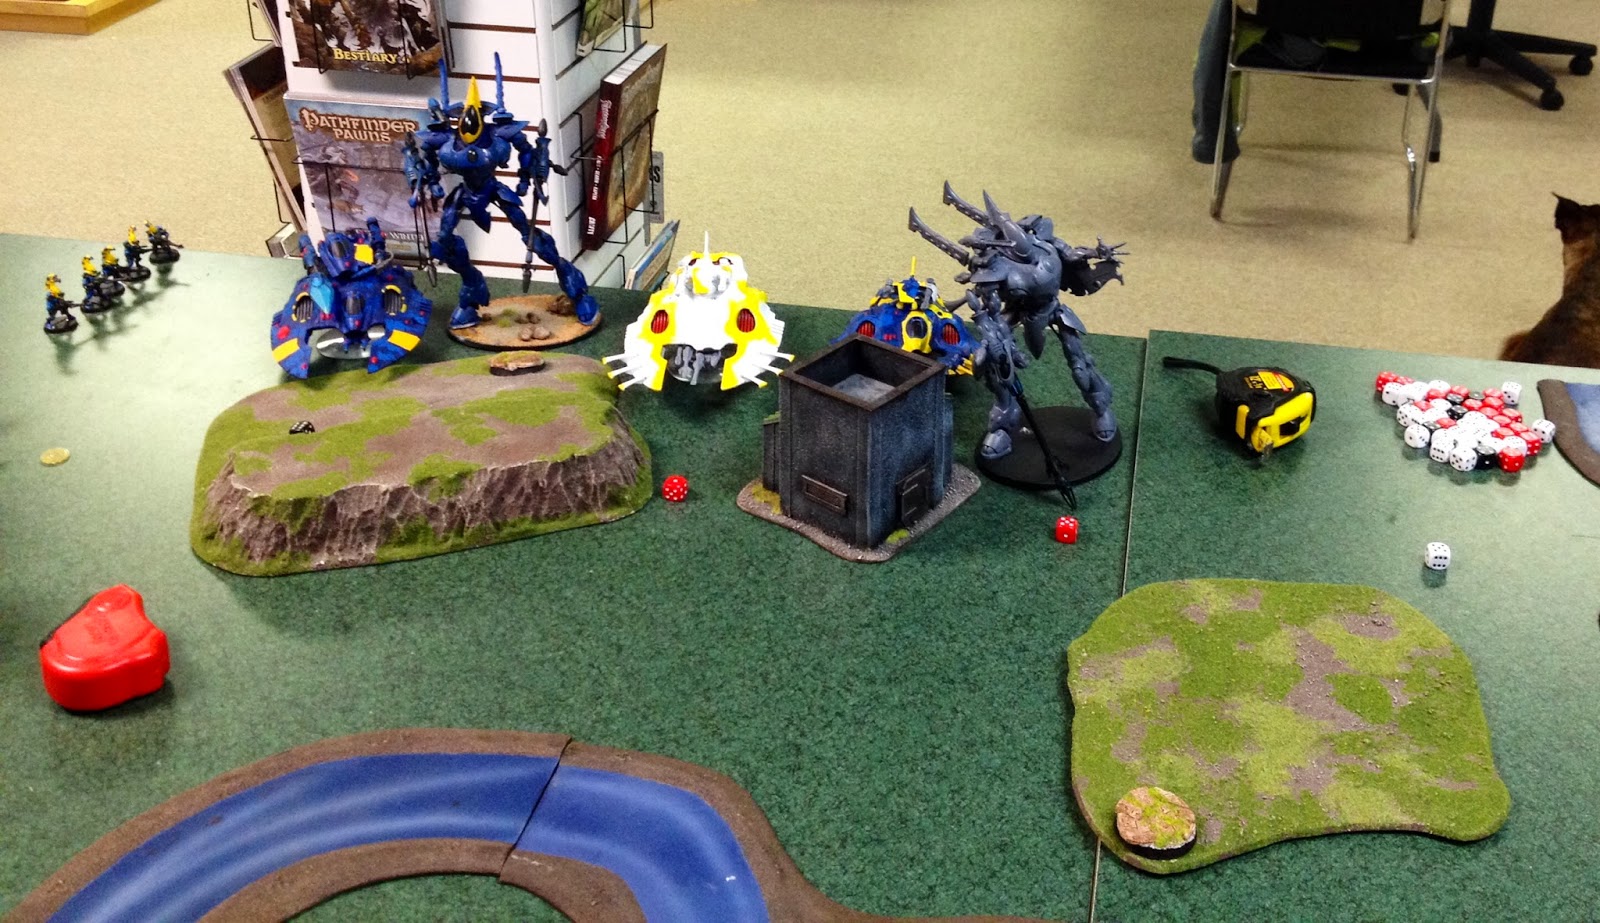 |
| Eldar Deployment |
Todd Deployed his Defence line in the center of the board, and put his Scouts behind it. The Landraider deployed on the same flank as the rest of my army, flanked by both units of Bikes and Khan, and with the Darkshroud behind it to give out cover saves. Sammael and the Ironclad went in reserve.
 |
| Space Marine Deployment |
Turn 1
Todd begins by scouting up his Landraider and bikes a bit, along with the Darkshroud to get some jink saves and stuff. The Melta Bikes move in front of the Raider to grant it cover with their own bodies. Wasteful Mon'Keigh. The Wave Serpents move to my left to get away from the approaching Marines and get a better shot at the Darkshroud. The Suncannon Wraithknight goes with them, and the Cannon Knight moves over as well. The Fire Prism shuffles a bit to get a jink, and hopefully out of assault range on his turn.
Shooting begins with the Wave Serpents firing their Shields into the Darkshroud, which explodes under the weight of fire, granting the Eldar First Blood. Next comes the Wraithknight who fires its Heavy Wraithcannons into the Landraider, and despite two hits, it fails to get even a glance through. The Suncannon Knight shoots into Khan's Bike Squad and kills one. The Fire Prism tries to do the same, but scatters badly and does no damage. The Mantarch Turbo-Boosts right up to the Scouts.
The Marines respond by jetting forwards. The Melta Bikes bank hard to go deal with the pesky Solitaire harassing their recruits. Meanwhile the Landraider and the Grav Bikes keep their course and move straight towards the Fireprism and Wraithcannon toting Wriathknight. Streaking through the heavens comes the Drop Pod which manages to land directly behind the Fire Prism.
The Ironclad Dreadnought steps out of its transport and fires the Meltagun into the rear of the Fire Prism, but the pilot jinks out of the way. In anger, it fires the Heavy Flamer which Ignites the Fire Prisms engine fuel, causing it to explode. The Grav Bikes fire their Grav Guns into the Wraithknight, but do a bad job and only manage to get one wound through. The Scouts and Melta Bikes all fire everything they have at the giggling Solitaire, but his trickery keeps him safe from all harm.
Enraged by the alien's mockery, the Space Marines charge the Autarch, and though the Sergent decides not to accept the Solitaire's challenge, combined attacks from the scouts and bikers do a wound to the Mantarch, who manages to do absolutely nothing in return. Having had enough of this combat, the Solitaire hit and runs off back the way he came, while the White Scars go the other direction, attempting to get behind a building.
 |
| End of Turn 1 |
Turn 2
Seeing that the Space Marines are closing quickly, the Eldar continue to move away, with the Wave Serpents Turbo-Boosting away. The Suncannon Wraithknight moves to get line of sight on the Melta Bikes. The Wraithcannon Wraithknight Moves away from the Dreadnought, hoping to target the Landraider again. The Jetbikes boost onto the field, and Turbo-Boost up towards the Scouts.
Once again, the Wraithcannons fire into the Landraider, and once again they fail to do anything. The Suncannon Knight unleashes the devastating power of its weapon on the Melta Bikes clustered behind the building, and slaughters them to a man.The Mantarch Turbo-Boosts away from the scouts.
Eager to put an end to the aliens, Sammael deep strikes in next to the Drop Pod. The Bikes drive up and the Landraider unloads its cargo, who move towards the Wraithcannon Knight. Firing everything they have at the Wraithknight has little effect, only doing one more wound to the construct. The Scouts shoot the Quad gun and their Sniper Rifles into the Jetbikes and manage to kill all three of them. The Terminators then charge the Knight and though they lose one of their number, they manage to down it, and move off towards the Wave Serpents.
 |
| End of Turn 2 |
The dire avengers jump out of their Wave Serpent to fire on the Terminators. The Wraithguard Serpent moves away, as does the Dire Avenger Wave Serpent which turns to face the Terminators. The Wraithknight jumps forwards to shoot at the Scouts.
The Dire Avengers kick things off by unloading their guns into the Terminators, killing two. Both Wave Serpents follow suit, and under the barrage of lasers, energy fields, and shuriken, the Terminators are killed. The Wraithknight once again fires its Suncannon, this time into the scouts, killing 2 of them. The Solitaire boosts up behind the Scouts again, ready to fight them.
Moving around to try and get a shot on the flighty Eldar, the Bikes and Landraider drive towards the Wraithknight. Sammael follows suit, and the Dreadnought lumbers towards the tanks impotently. Firing everything they have at the Wraithknight only does a single wound to the construct, and the snap-firing Scouts fail to hurt the Autarch
 |
| End of Turn 3 |
Moving forward the Wraithknight walks towards the Landraider. The Dire Avengers' Wave Serpent cruises over to help deal with the Bikes while the Wraithguard Serpent drives up to hopefully damage the Ironclad with its shield. The Dire Avengers move towards the objective by the cairne.
Unloading its guns on the Bikes, the Wave Serpent manages to kill three of them, leaving just one bike and Khan left. The other Serpent only does one glance to the Ironclad. The Wraithknight charges the Landraider and manages to Immobilize it and do one Hullpoint. The Solitaire assaults the Scouts, and fails to do any damage but takes none himself.
The Ironclad moves over towards the Wraithknight bashing against the Landraider, as do Sammael and Khan. The Lone Biker moves over towards the objective behind the hill. Shooting does no damage to the Wraithknight. Khan then charges the Wraithknight, who crushes him beneath its huge foot. Once again the Mantarch combat is a slap fight, and to make things worse, he fails to hit and run away.
 |
| End of Turn 4 |
Once again the Wave Serpents move around, the Wraithguard one moving towards the Objective near the Bike to try and claim or contest it if there's another turn. Shooting their shields into the Ironclad only does one more hullpoint to it. In assault the Mantarch once again whiffs and the Wraithknight only does one hull point to the Landraider.
Seeing an opportunity, Sammael moves to shoot at the Dire Avengers, while the Dreadnought moves into assault range of the Wraithknight. Firing the Assault Cannon and Heavy Bolter with Sammael kills 4 of the 5 Dire Avengers. The Landraider fires its Assault Cannon into the last one and kills him off as well. The Dreadnought assaults the Wraithknight who whiffs yet again. The Dreadnought does one wound in turn. Again, the slap fight between the Scouts and the Autarch continues. We roll for game length, and the game ends this turn.
 |
| End of the Game |
Total Points
Eldar - 6 (One Objective, First Blood, Slay the Warlord, Line Breaker)
Space Marines - 6 (One Objective, Line Breaker, Two Heavy Kills)
Post-Game Thoughts
That was a really fun game, although I think I really could have played it much better. I made some mistakes at the end of the game, and it definitely cost me a win. I should have moved the Wraithguard onto the objective held by my Dire Avengers to ensure that I would have it at the end of the game. I also shouldn't have Turbo-Boosted my Mantarch away from the Scouts turn 2, but I made the mistake of doing it before I fired my Suncannon. Had I fired the Suncannon first I could have assaulted the Scouts Turn 2 and possibly done something to them, maybe even wiping them off the objective, and probably keeping my bikes alive to claim it.
I also had some poor luck in the last two turns of the game, between not killing the Landraider when I assaulted it, and my Mantarch failing its hit and run turn 4. If the game had not ended turn 5 I almost certainly have been able to take the Biker off of my objective as well. Such is the nature of the game though, and had I not made so many tactical blunders these things wouldn't have mattered at all.
I think Todd played his list well as well, though I'm not sure moving his Bike Squad off to fight my Mantarch was wise, as had I managed to roll a bit better in combat, it could have done some damage to them, not to mention the fact that it put them in a position to be annihilated by the Suncannon.
I would have to say my Suncannon Wraithknight was easily my MVP this game, between blasting the Bike squad, killing some Scouts, beating the shit out of Khan, and punching up a Landraider, he did some serious damage. I definitely wouldn't take the dual Heavy Wraithcannon Wraithknight again. The lack of invulnerable save really is a big down side to it, as anything that can really hurt a Wraithknight is ignoring your save anyways. I also don't find the Wraithcannons to be very reliable, though not rolling well to penetrate didn't help my opinion of it. The Mantarch didn't do much either, but that's largely bad rolling as much as anything else. There also wasn't much in the way of vehicles for him to pop, so that didn't help.
Overall it was a fun game and I feel like I learned a lot. As always, thanks for reading.
Subscribe to:
Posts (Atom)